Published On May 6, 2024
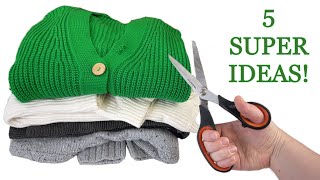
1) How to turn a stretched sweater into a stylish jacket. We need to cut it into pieces and put everything back together.
Master Class:
- I laid out the sweater on the table, aligned everything well and straightened it out. From the bottom of the elastic I marked 6.5 cm. This value may be greater, depending on the length of the sweater.
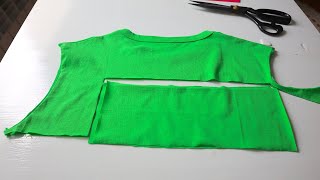
- Now in front, where I cut off, I marked the middle point. From it upward I drew two straight lines to the neck. Then I cut the sweater along them, including the back of the neck.
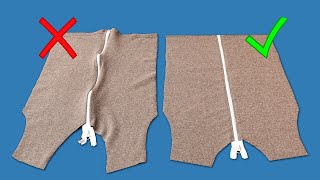
- I ripped the side seams down to the sleeves. On the back of the shelf I marked 4 cm at the bottom on both sides and connected these points with the points on the armhole. I cut off the excess knitwear. Due to this, the front smell added 8 cm.
- The shoulder line was reduced by 2 cm. All seams were sewn on a sewing machine, and then overcast with a zigzag.
- I placed a stabilizing stitch along the neck line so that the fabric did not stretch.
- I cut off the elastic from the strip that was below.
- I cut the rest of the fabric in the middle; I will use it to make the neck facing. To do this, I folded it in half and made it a little less long than the okat.
- I applied the facing to the sweater, stretched it a little and stitched it, and sewed the edges.
- I reduced the length of the sleeves by cutting off 3 cm from the elastic, this value may vary. Then I re-stitched the elastic.
- I also reduced the elastic band that goes at the bottom of the product.
- The wrap-around blouse is ready.
If the neckline is still open, then you can wear a top underneath.
2) I took a practical new sweater and immediately cut it. I’ll show you what an exquisite Chanel-style item I made (minimal sewing).
For sewing, you can use not only women's, but also men's sweaters. The peculiarity of the model is the finishing around the edges. It can be the same color as the thing itself, or another, even multi-colored; you can also use fur for this.
Other features of the model are a straight cut, pockets and a shortened length.
It’s easy to practice sewing on a sweater, and now I’ll show you how I do it:
- First, I shortened the sweater to such a length that it was 5–10 cm below the waist.
- I cut off the length of the sleeves, you can make three quarters.
- Cut off the neck.
- I cut the sweater in the middle. I cut out pockets from the cut pieces.
- I rounded all the corners a little.
- I laid a line along the neck line so that it would not stretch.
- I made a roll for a loop from a strip of fabric. I cut it out on the bias; the peculiarity of the roll is that it turns out as hard as a cord, thanks to its allowances.
- To finish the edges you will need bias tape. It can be knitwear, viscose, silk, basically whatever you like.
- I basted the binding to the jacket from the wrong side, stitched it and turned it right side out.
- I turned it 1 cm and basted it. On rounded corners, I reduced the length of the basting stitches and adjusted the binding itself. After that I stitched.
- I finished the bottom of the sleeves with bias tape.
- I did the same on the pockets.
- I sewed on pockets and a button.
Ready!
3) Sewing shops don't want you to know this. One detail and an item is completely changed, and the budget savings on clothing repairs are colossal.
To work, you will need a detachable zipper of a suitable color. It's okay if it's longer than needed.
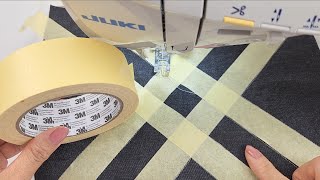
First of all, you need to make a marking where the zipper will be sewn. There are no restrictions on how the fastener will be positioned. You can sew it on the side or up to the chest. Mine will be in the middle. To do this, you need to draw a straight line strictly in the middle.
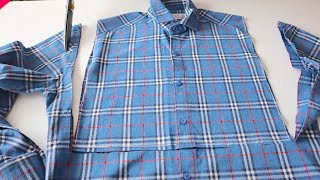
- I joined the shoulder seams, folded the neckline and marked the fold point. Same thing below - I connected the side seams and found the middle. I drew a line.
- As a result, I cut the sweater in the front.
- To strengthen the sections, I used strips of non-woven fabric on a fabric basis.
- I disconnected the zipper and applied it to one side. I changed the foot on the zipper machine and stitched it.
- In order for the second part of the zipper to be sewn smoothly and without distortions, you need to fasten it and make marks on the second part at the bottom and top (where the collar stand is). After this, unzip the zipper, align the marks and stitch. In this case, the zipper will be sewn in place, and the elastic at the neck will be symmetrical.
- I cut off the excess length of the zipper, leaving 1.5 cm, folded the edges at right angles and sewed them on by hand.
- To hide the seams, I used satin ribbon, cut it in the middle, placed it on the front side and stitched it, bending the ends to hide the edges of the zippers.
- Then I turned it inside out and sewed a finishing stitch.
- The sweater has been updated and turned into a blouse.
This way you can sew in a zipper yourself or replace a broken one with a new one.